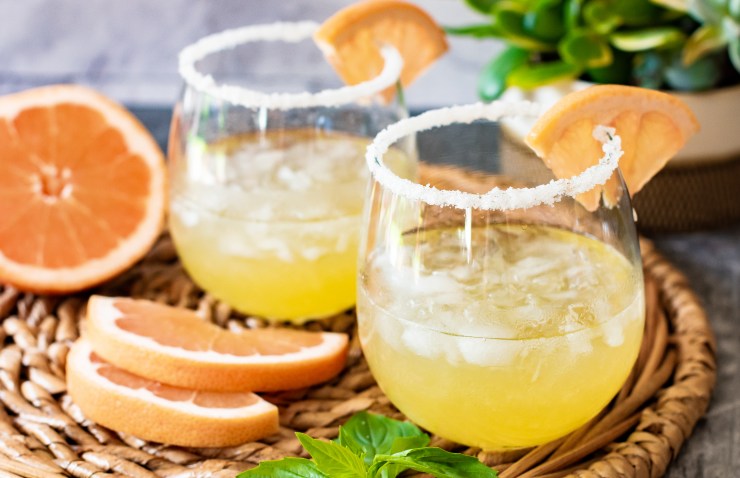
With a perfect balance between sweet and tart and the distinct fruity flavor of lilikoi, this cocktail is bound to become a favorite!

Our lilikoi production was big this year, which is a great thing. We LOVE lilikoi. And I love finding new ways to use it. So why do we love lilikoi? It’s hard not to love this unique fruit with its strong floral fragrance and distinct flavor, ranging from tart to sweet. It’s also incredibly versatile; lilikoi can be used in teas, lemonade, cocktails, desserts, jams, butter, sorbets, ice cream, pies, and cakes; the list of possibilities are endless!

I freeze most of the juice we get from the lilikoi, so we enjoy its amazing flavor year-round – it really feels like we are spoiled sometimes! If you want to read more on lilikoi, you can find information here.
Cocktail Tools:
What makes cocktails fun to make for me are the tools. So, one year for Christmas, I got my husband a bartender set of cocktail tools. He still questions if that gift was really for him… But, hey, he gets to reap the reward of great cocktails, so either way, he is a winner!
A great cocktail set like the one pictured below is great to have if you enjoy making cocktails. Having the right tools certainly makes creating the perfect cocktails easier and, in my opinion, more fun. You can find this set here.

I’ll go over a few of the tools l like to use and ways to improvise if you don’t have them. But if you do like cocktails, a bartending set makes for a great gift.


Cobbler Shaker: A typical shaker consists of a cap, a top with a built-in strainer, and a cup base. You add all the drink ingredients, add ice and shake. You then take the cap off, and the built-in strainer filters out leaves and ice.
Boston Shaker: This is the cocktail shaker of choice for most bartenders and true cocktail apprentices. The Boston shaker consists of a shaking metal tin and a mixing glass but has no built-in strainer. A strainer must be purchased separately; typically, a Hawthorne strainer (shown above) is used. To seal the shaker, you must place the glass on top of the metal tin and, with a firm grip, tap on the backside of the glass. To unseal, you have to tap the side of the metal tin. This water sealing must be done carefully and perfectly so you don’t either break your glass or wear the cocktail on your clothes the rest of the evening.
- If you don’t have a shaker, any tall bottle with a lid will work. Just add your ingredients, shake and pour. Be sure to strain out any leaves.
Jigger: Vital for precise measuring. Usually, it has a cone shape on each end, like the one above. Mine measures an ounce on one end and a 1/2 ounce on the other. The ounce measurement is often used when making cocktails, so having a jigger makes measuring accurately extremely easy.
- If you don’t have a jigger, one fluid ounce equals two tablespoons, or use a measuring cup with ounces labeled.
Muddler: Used for crushing fruit or leaves (mint or basil typically). To use the muddler, gently press down on the leaves or fruit and give a half-turn of the muddler. Next, lift and continue this motion until the ingredients are sufficiently muddled. This will generally take about four to six turns.
- In place of a muddle, you could use the end of a wooden spoon or another blunt object and use it the same way you would use a muddler.
Lilikoi juice:
If you are using store-bought lilikoi juice, try to find it unsweetened. If it’s sweetened, consider leaving out the honey for this recipe. If you are using fresh lilikoi juice from the fruit, I’ll give you some tips on getting the most juice out of them:

- Cut the fruit in half with a serrated knife that will grip the fruit (like a bread knife). The rinds are thick a slippery, and you don’t want to cut yourself because your knife slipped. Once cut, scoop out the seeds, pulp, and juice with a spoon. Some fruits will yield more fruit than others. I scoop mine directly into a blender.
- Blend the pulp and seeds for 5 to 10 seconds in a standard blender. This helps to release the juice from around the seeds. However, this will not break up the seeds; they will stay intact.
- Pour the lilikoi juice and the seeds into a strainer over a small bowl. Use the back of a spoon to press the pulp in the strainer to extract the most juice. ** Take note of how amazing your kitchen smells. Lilikoi is my favorite fragrance!!

For this Cocktail:
- First, add the lilikoi juice, mint leaves (tearing them once), and honey to the cocktail shaker. Next, muddle the mint, honey, and lilikoi juice in the bottom of the cocktail shaker. **Muddling is the process of gently crushing the mint leaves to release their oils (Press down on the mint leaves and give a half-turn of the muddler. Lift and continue this motion until the ingredients are sufficiently muddled. This will generally take about four to six turns. You can read more about how to muddle cocktails here.
- Add the white rum or gin to the cocktail shaker, then fill the shaker with ice cubes. Shake until chilled, about 15 to 20 seconds. **You can use any neutral flavored liquor. Just don’t use anything with flavoring added, like fruit extracts. This will change the flavor of your cocktail.
- Fill two cocktail glasses with crushed ice. Strain the mixture evenly into the glasses. You’ll only have about 4 ounces for each cocktail or half a cup each. Use the club soda or seltzer water to fill the glasses. This adds a nice bubbly touch to your cocktail.
- Garnish with mint leaves and lemon or lime wedges (optional).


Lilikoi Mint Cocktail
Equipment
- Cocktail Shaker
- Muddler
- Strainer
Ingredients
- 4 ounces lilikoi juice (passion fruit)
- 25 fresh mint leaves
- 1 – 1½ ounces honey, depending on sweetness preference
- 4 ounces white rum or gin
- lemon or lime seltzer water or club soda, optional
Garnish:
- mint leaves
- lemon or lime wedges
Instructions
- Add the lilikoi juice, mint leaves, tearing them once, and the honey to the cocktail shaker. Muddle the mint, honey, and lilikoi juice in the bottom of the cocktail shaker. **Muddling is the process of gently crushing the mint leaves to release their oils (Press down on the mint leaves and give a half-turn of the muddler. Lift and continue this motion until the ingredients are sufficiently muddled. This will generally take about four to six turns.
- Add the white rum or gin to the cocktail shaker, then fill the shaker with ice cubes. Shake until chilled, about 15 to 20 seconds.
- Fill two glasses with crushed ice. Strain the mixture evenly into the glasses. Add the club soda or seltzer water to fill the glasses.
- Garnish with mint leaves and lemon or lime wedges (optional).


 My kids love hot cocoa! I drink my coffee in the morning; they drink their hot cocoa, everyone’s happy! One thing I struggled with for years, though, was finding a packaged hot cocoa mix that wasn’t loaded with “extra” ingredients – ingredients that I couldn’t even pronounce! When I would come across hot cocoa packets that I felt comfortable giving to my kids, I often found them expensive. Finally, tired of the frustration, I decided to make it myself. So through researching recipes and trial-and-error, voilà! HOMEMADE HOT COCOA MIX! It really isn’t rocket science. It’s incredibly easy to make, and I love that there are no mystery ingredients!